
Preference Center Demystified
Email preference centers can unlock a wealth of subscriber information if executed properly. Learn more about them to create the personalized email experiences that build loyalty and trust.


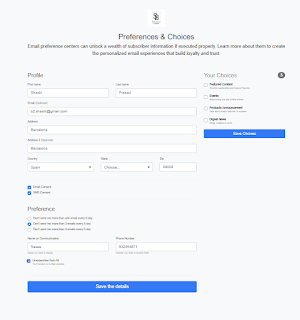
Let's learn how to build Preference Center
Before diving into the technicalities, it's important to define your goals for the preference center. Determine what type of information you want to collect from your customers and how you plan to use it. Are you focused on email preferences, content preferences, or both? Understanding your objectives will help you design a preference center that aligns with your specific needs.
A Step-by-Step Guide to Building a Powerful Preference Center
When building a preference center, utilizing a data extension is a fundamental step to efficiently store and manage customer profile information, consents, preferences, and choices. By using a data extension, you can organize and access this data easily, allowing for seamless personalization and targeted communication. Here are some key points to consider when working with a data extension in your preference center:
- Profile Information :
Create fields within the data extension to capture and store essential customer details, such as name, contact information, demographic data, and any other relevant information for a comprehensive customer profile. - Consents :
Include fields to track and store customer consent preferences. This could involve checkboxes or opt-in/out options for various types of communications, ensuring compliance with data protection regulations and respecting customer preferences. - Preferences :
Design fields that enable customers to indicate their content preferences, such as topics or categories they are interested in. This information helps tailor communication and provide personalized content to enhance engagement. - Choices :
Allow customers to make choices regarding communication frequency, such as how often they wish to receive emails or updates from your brand. This empowers them to control their inbox and prevents overwhelming or unwanted messages.
By utilizing a data extension and implementing these pointers, you can effectively collect and store customer data, consents, preferences, and choices within your preference center, enabling targeted and personalized communication that enhances the overall customer experience.
Let's build Preference Center
-
Step 1: Design Data Extensions
- Profile

- Consents

- Preferences

- Choices

- Profile
-
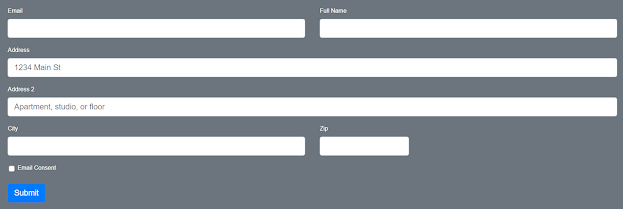
Step 2: Web Development
- Landing page
Create an empty html page with just html opening and closing tag

<!DOCTYPE html> <html> </html> - Code Snippets
-
CSS Code Snippet
Create a code snippet for storing the meta tags and css links

<meta http-equiv="Content-Type" content="text/html; charset=UTF-8" /> <meta name="viewport" content="width=device-width, initial-scale=1, maximum-scale=1, user-scalable=no"> <meta http-equiv="Content-Type" content="text/html; charset=UTF-8" /> <link rel="stylesheet" href="https://cdn.jsdelivr.net/npm/bootstrap@5.2.0/dist/css/bootstrap.min.css"> <link rel="stylesheet" href="https://cdnjs.cloudflare.com/ajax/libs/twitter-bootstrap/4.5.2/css/bootstrap.css"> <link rel="canonical" href="https://getbootstrap.com/docs/4.0/examples/checkout/"> <link rel="stylesheet" href="https://mcs9w798j62y0yjmcfb0tt78793m.pub.sfmc-content.com/3x5lt0ynoc1">essage); <meta name="viewport" content="width=device-width, initial-scale=1, maximum-scale=1, user-scalable=0" /> -
HTML Code Snippet
Create a code snippet for designing your web page
<div class="container"> <div class="py-5 text-center"> <img class="d-block mx-auto mb-4" src="https://blogger.googleusercontent.com/img/b/R29vZ2xl/AVvXsEiJRxBCaw-e7WQh8Ri4PUilAgZ6obVWauFh7BVrMk1vRc6jh1Xv588DIU3aqWuSKoRhmsc1lFpGbu7iMGzHWgbNLy_e6QqSCvYbGqyT2cm-7_94-Qnt1YfVMfFIrmi1SAiqQ_ujxhyEspwEXrYtxCRCk6OOykK2UAMxY8coVBzQwHmZNNEO3_sRwAs5/s320/logo%20JPG%20format.jpg" alt="" width="75" height="75"> <h2>Preferences & Choices </h2> <p class="lead">Email preference centers can unlock a wealth of subscriber information if executed properly. Learn more about them to create the personalized email experiences that build loyalty and trust. </p> </div> <div class="row"> <div class="col-md-4 order-md-2 mb-4"> <h4 class="d-flex justify-content-between align-items-center mb-3"> <span class="text-muted">Your Choices</span> <span class="badge badge-secondary badge-pill">3</span> </h4> <form class="needs-validation" novalidate> <div class="custom-control custom-checkbox"> <label class="custom-control-label" for="FeaturedContent"><b>Featured Content </b></label> <input type="checkbox" class="custom-control-input" id="FeaturedContent"> <br/> <small class="text-muted">Thouhts Leadership and Analyst Reports</small> </div> <br/> <div class="custom-control custom-checkbox"> <label class="custom-control-label" for="Events"><b>Events </b></label> <input type="checkbox" class="custom-control-input" id="Events"> <br/> <small class="text-muted">Announcing live and online events</small> </div> <br/> <div class="custom-control custom-checkbox"> <label class="custom-control-label" for="ProductsAnnouncement"><b>Products Announcement </b></label> <input type="checkbox" class="custom-control-input" id="ProductsAnnouncement"> <br/> <small class="text-muted">Hear about major features or updates</small> </div> <br/> <div class="custom-control custom-checkbox"> <label class="custom-control-label" for="same-address"><b>Digest News </b></label> <input type="checkbox" class="custom-control-input" id="same-address"> <br/> <small class="text-muted">Blogs, insights or news</small> </div> <br/> <button class="btn btn-primary btn-block" type="submit">Save Choices</button> </form> </div> <div class="col-md-8 order-md-1"> <h4 class="mb-3">Profile </h4> <form class="needs-validation" novalidate> <div class="row"> <div class="col-md-6 mb-3"> <label for="FirstName">First name</label> <input type="text" class="form-control" id="FirstName" placeholder="" value="%%=v(@FirstName)=%%" required> <div class="invalid-feedback"> Valid first name is required. </div> </div> <div class="col-md-6 mb-3"> <label for="LastName">Last name</label> <input type="text" class="form-control" id="LastName" placeholder="" value="%%=v(@LastName)=%%" required> <div class="invalid-feedback"> Valid last name is required. </div> </div> </div> <div class="mb-3"> <label for="Email">Email <span class="text-muted">(Optional)</span></label> <input type="email" class="form-control" id="Email" placeholder="you@example.com" value="%%=v(@Email)=%%"> <div class="invalid-feedback"> Please enter a valid email address for shipping updates. </div> </div> <div class="mb-3"> <label for="Address">Address</label> <input type="text" class="form-control" id="Address" placeholder="1234 Main St" required value="%%=v(@Address)=%%"> <div class="invalid-feedback"> Please enter your shipping address. </div> </div> <div class="mb-3"> <label for="Address2">Address 2 <span class="text-muted">(Optional)</span></label> <input type="text" class="form-control" id="Address2" placeholder="Apartment or suite" value="%%=v(@Address2)=%%"> </div> <div class="row"> <div class="col-md-5 mb-3"> <label for="country">Country</label> <select class="custom-select d-block w-100" id="Country" required name="Country" value="%%=v(@Country)=%%"> <option value="">Choose...</option> <option %%=v(@selectedUS)=%%>United States</option> <option %%=v(@selectedES)=%%>Spain</option> <option %%=v(@selectedIN)=%%>India</option> </select> <div class="invalid-feedback"> Please select a valid country. </div> </div> <div class="col-md-4 mb-3"> <label for="state">State</label> <select class="custom-select d-block w-100" id="state" required> <option value="">Choose...</option> <option %%=v(@selectedCA)=%%>California</option> <option %%=v(@selectedBCN)=%%>Barcelona</option> <option %%=v(@selectedWB)=%%>West Bengal</option> </select> <div class="invalid-feedback"> Please provide a valid state. </div> </div> <div class="col-md-3 mb-3"> <label for="Zip">Zip</label> <input type="text" class="form-control" id="Zip" placeholder="" required value="%%=v(@Zip)=%%"> <div class="invalid-feedback"> Zip code required. </div> </div> </div> <hr class="mb-4"> <div class="custom-control custom-checkbox"> <input type="checkbox" class="custom-control-input" id="EmailConsent" name="EmailConsent" value="%%=v(@EmailConsent)=%%" %%=v(@EmailConsentChecked)=%%> <label class="custom-control-label" for="EmailConsent">Email Consent</label> </div> <div class="custom-control custom-checkbox"> <input type="checkbox" class="custom-control-input" id="SMSConsent" name="SMSConsent" value="%%=v(@SMSConsents)=%%" %%=v(@SMSConsentsChecked)=%%> <label class="custom-control-label" for="SMSConsent">SMS Consent</label> </div> <hr class="mb-4"> <h4 class="mb-3">Preference </h4> <div class="d-block my-3"> <div class="custom-control custom-radio"> <input id="marketpressure1" name="marketpressure" type="radio" class="custom-control-input" %%=v(@radio1)=%% required> <label class="custom-control-label" for="marketpressure1">Don't send me more than one email every 5 day </label> </div> <div class="custom-control custom-radio"> <input id="marketpressure2" name="marketpressure" type="radio" class="custom-control-input" %%=v(@radio2)=%% required> <label class="custom-control-label" for="marketpressure2">Don't send me more than 2 emails every 5 day</label> </div> <div class="custom-control custom-radio"> <input id="marketpressure3" name="marketpressure" type="radio" class="custom-control-input" %%=v(@radio3)=%% required> <label class="custom-control-label" for="marketpressure3">Don't send me more than 3 emails every 5 day</label> </div> </div> <div class="row"> <div class="col-md-6 mb-3"> <label for="cc-name">Name on Communication</label> <input type="text" class="form-control" id="DisplayName" placeholder="" required value="%%=v(@DisplayName)=%%"> <small class="text-muted">Name you want to display</small> <div class="invalid-feedback"> Display name is required </div> </div> <div class="col-md-6 mb-3"> <label for="cc-number">Phone Number</label> <input type="text" class="form-control" id="Phone" placeholder="" required value="%%=v(@Phone)=%%"> <small class="text-muted">Number you want to receive SMS</small> <div class="invalid-feedback"> Phone number is required </div> </div> </div> <div class="row"> <div class="mb-4"> <div class="custom-control custom-checkbox"> <input type="checkbox" class="custom-control-input" id="UnsubscriberAll" name="UnsubscriberAll" value="%%=v(@UnsubscriberAll)=%%" %%=v(@UnsubscriberAllChecked)=%%> <label class="custom-control-label" for="UnsubscriberAll">Unsubscriber from All</label> <br/> <small class="text-muted">You'll receive no further updates.</small> </div> </div> </div> <hr class="mb-4"> <button class="btn btn-primary btn-lg btn-block" type="submit">Save the details</button> </form> </div> </div> </div> -
SSJS Code Snippet
Create a code snippet rendering the web page via SSJS Retreive functions
<script type="text/javascript" runat="server">
  Platform.Load("Core","1")
  try{
    var subscriberKey = Variable.GetValue("@subscriberKey");
    var subscriberKey = "b2.shashi@gmail.com";
    if(subscriberKey){
       //==== ** Fetch Profile details for personalization **====//
       var profileDE = DataExtension.Init("Profile");
    var filter = {
      Property:"Subscriberkey",SimpleOperator:"equals",Value:subscriberKey};
    var subscriberDetails = profileDE.Rows.Retrieve(filter);
    Variable.SetValue("@FirstName",subscriberDetails[0].FirstName);
    Variable.SetValue("@LastName",subscriberDetails[0].LastName);
    Variable.SetValue("@Email",subscriberDetails[0].Email);
    Variable.SetValue("@Address",subscriberDetails[0].Address);
    Variable.SetValue("@Address2",subscriberDetails[0].Address2);
    Variable.SetValue("@Country",subscriberDetails[0].Country);
    Variable.SetValue("@Zip",subscriberDetails[0].Zip);
    Variable.SetValue("@State",subscriberDetails[0].State);
    if(subscriberDetails[0].Country=="Spain")
    {
      Variable.SetValue("@selectedES","selected");
    }
    else
      Variable.SetValue("@selectedUS","selected");
    //========================================================//
    //==== ** Fetch Profile details for personalization **====//
    var consentsDE = DataExtension.Init("Consents");
    var filter = {
      Property:"Subscriberkey",SimpleOperator:"equals",Value:subscriberKey};
    var consentsDetails = consentsDE.Rows.Retrieve(filter);
    Variable.SetValue("@EmailConsent",consentsDetails[0].EmailConsent);
    Variable.SetValue("@SMSConsents",consentsDetails[0].SMSConsents);
    if(consentsDetails[0].EmailConsent)
    {
      if(consentsDetails[0].EmailConsent==="True")
        Variable.SetValue("@EmailConsentChecked","checked");
      else
        Variable.SetValue("@EmailConsentChecked",null);
    }
    if(consentsDetails[0].SMSConsents==="True")
      Variable.SetValue("@SMSConsentsChecked","checked");
    else
      Variable.SetValue("@SMSConsentsChecked",null);
    //========================================================//
    //==== ** Preferences Profile details for personalization **====//
    var PreferencesDE = DataExtension.Init("Preference");
    var filter = {
      Property:"Subscriberkey",SimpleOperator:"equals",Value:subscriberKey};
    var preferenceDetails = PreferencesDE.Rows.Retrieve(filter);
    Variable.SetValue("@DisplayName",preferenceDetails[0].DisplayName);
    Variable.SetValue("@Phone",preferenceDetails[0].Phone);
    Variable.SetValue("@UnsubscriberAll",preferenceDetails[0].UnsubscriberAll);
    if(preferenceDetails[0].UnsubscriberAll==="True")
      Variable.SetValue("@UnsubscriberAllChecked","checked");
    else
      Variable.SetValue("@UnsubscriberAllChecked",null);
    if(preferenceDetails[0].SuppressionDays==1)
      Variable.SetValue("@radio1","checked");
    else if(preferenceDetails[0].SuppressionDays==2)
      Variable.SetValue("@radio2","checked");
    else
      Variable.SetValue("@radio3","checked");
    //========================================================//
  }
  }
  catch(ex)
  {
    Write(ex.message);
  }
</script>
-
CSS Code Snippet
- Edit Landing page
Edit the landing page and append code snippets we designed above

<html>
  <head>
   %%=ContentBlockByKey("PreferenceCenterCss")=%%
    <title> Shashi's Preference Center
    </title>
    %%[
       set @subscriberKey = RequestParameter("subscriberKey")
    ]%%
    %%=ContentBlockByKey("PreferenceSSJS")=%%
  </head>
  <body class="bg-light">
    %%=ContentBlockByKey("PreferenceCenter")=%%
  </body>
</html>
- Landing page
-
Step 3: Save and Publish


Deep Dive into Preference Center's Technical Details
During the construction of our preference center, we harnessed the power of code snippets, offering numerous advantages. Let's explore the benefits gained by leveraging code snippets:
- Reusability :
Code snippets provide the advantage of reusable components, allowing you to efficiently incorporate common functionalities or design elements across multiple pages within your preference center. This saves time and effort by eliminating the need to recreate the same code from scratch. - Easy Maintenance and Updates :
By using code snippets, you can make updates or modifications to a specific component in one central location. This ensures consistency throughout your preference center, reducing the risk of inconsistencies or errors that may arise from updating individual pages separately. - Time and Effort Savings :
When utilizing code snippets, there is no need to republish the entire preference center or cloud page every time a minor change is made. This significantly speeds up the development process and eliminates unnecessary delays in updating your preference center. - Modularity and Scalability :
Code snippets promote modularity, allowing you to break down your preference center into smaller, manageable components. This modular approach facilitates scalability, enabling you to easily add or remove features, sections, or functionalities as your preference center evolves over time. - Consistent User Experience :
By incorporating code snippets, you can ensure a consistent user experience throughout your preference center. The standardized code snippets guarantee that the same design and functionality are applied across various pages, resulting in a cohesive and intuitive user interface. - Collaboration and Collaboration :
Code snippets facilitate collaboration among developers and designers working on the preference center. The ability to share and reuse snippets promotes a more efficient workflow, enabling team members to work in parallel and leverage each other's expertise.
In summary, leveraging code snippets brings several advantages to preference center development, including reusability, easy maintenance and updates, time and effort savings, modularity, scalability, consistent user experience, and enhanced collaboration. Incorporating these snippets can streamline the development process and help you create a robust and efficient preference center for your customers.
During the construction of our preference center, we implemented extensive personalization techniques to enhance the user experience by pre-populating form details for our subscribers. Now, let's delve into the ways we leveraged personalization to optimize our preference center:
- Data Rendering :
We rendered subscribers' profile via SSJS Data Extension Rows Retreive function. Below is the sample code snippet:<script type="text/javascript" runat="server"> Platform.Load("Core","1") try{ var subscriberKey = Variable.GetValue("@subscriberKey"); if(subscriberKey){ var profileDE = DataExtension.Init("Profile"); var filter = {Property:"Subscriberkey",SimpleOperator:"equals",Value:subscriberKey}; var subscriberDetails = profileDE.Rows.Retrieve(filter); } } catch(ex){ Write(ex.message); } </script> - Translated Javascript variables into AMPScript variables :
AMPScript variables have a global scope unlike JavaScript variables, which means they can be accessed throughout the entire codebase. Additionally, AMPScript offers a convenient way to append additional attributes to HTML tags, making the process much simpler compared to JavaScript variables.
Below SSJS Utility function helps creating AMPScript variables:<script type="text/javascript" runat="server"> Platform.Load("Core","1") Variable.SetValue("@FirstName","Shashi"); Variable.SetValue("@LastName","Prasad"); </script> - Personalization :
We personalized form data using AMPScript "v" function.<div class="col-md-6 mb-3"> <label for="LastName">Last name</label> <input type="text" class="form-control" id="LastName" placeholder="" value="%%=v(@LastName)=%%" required> <div class="invalid-feedback"> Valid last name is required. </div> </div> </div> <div class="mb-3"> <label for="Email">Email <span class="text-muted">(Optional)</span></label> <input type="email" class="form-control" id="Email" placeholder="you@example.com" value="%%=v(@Email)=%%"> <div class="invalid-feedback"> Please enter a valid email address for shipping updates. </div> <select class="custom-select d-block w-100" id="Country" required name="Country" value="%%=v(@Country)=%%"> <option value="">Choose...</option> <option %%=v(@selectedUS)=%%>United States</option> <option %%=v(@selectedES)=%%>Spain</option> <option %%=v(@selectedIN)=%%>India</option> </select> <div class="custom-control custom-checkbox"> <input type="checkbox" class="custom-control-input" id="EmailConsent" name="EmailConsent" value="%%=v(@EmailConsent)=%%" %%=v(@EmailConsentChecked)=%%> <label class="custom-control-label" for="EmailConsent">Email Consent</label> </div>
In conclusion, through a series of informative blog posts, we have aimed to demystify the intricacies of preference center development and design. By exploring various aspects such as building a preference center, leveraging code snippets, implementing personalization, and understanding technical details, we have provided valuable insights to empower businesses and individuals in creating effective preference centers. We encourage everyone to stay tuned and keep reading as we continue to unlock more tips, best practices, and strategies to optimize preference centers and deliver exceptional customer experiences.
Read about us for more info and experience.


Thank you so much Bhaiya. I am going to try this today
ReplyDelete