
CLOUD PAGE ENABLEMENT - PART 1
CREATE A CLOUD PAGE IN MARKETING CLOUD
USE CASE :
Create a landing page in marketing cloud to collect consent from subscribers.

Step 1:
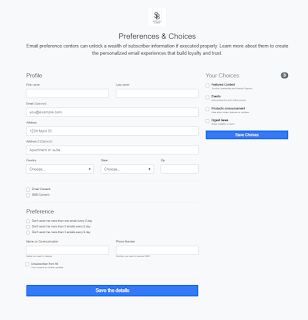
Create a landing page and publish it [no coding required]

Step 2:
Build a form control using bootstrap
<form class="row g-3"
action="https://tenantEndpoint/ConsentCollection"
method="Post">
</form>
- Update your form "action" attribute value with your cloud page URL.
- Method attribute "Post"
Add form controls
To collect email, add the below form control
<div class="col-md-6">
<label for="inputEmail4" class="form-label">Email</label>
<input type="email" class="form-control"
id="inputEmail4" name="inputEmail4"
value="%%=v(@inputEmail4)=%%" required %%=v(@disabled)=%%>
</div>
Points to consider while designing the input tag for your form control:
Attributes :
a) "id" and "name" > always keep the attribute value same
b) value attribute [game changer] > use AMPScript Personalization [%%=v(@inputEmail4)=%% ]
Add checkbox as form control
<div class="form-check">
<input class="form-check-input" type="checkbox"
id="gridCheck" name="gridCheck"
value="%%=v(@gridCheck)=%%" %%=v(@disabled)=%%>
<label class="form-check-label" for="gridCheck">
Email Consent
</label>
</div>
Here is the full sets of form controls that we would collect :
<form class="row g-3"
action="https://tenantEndpoint/ConsentCollection"
method="Post">
<div class="col-md-6">
<label for="inputEmail4" class="form-label">Email</label>
<input type="email" class="form-control"
id="inputEmail4" name="inputEmail4"
value="%%=v(@inputEmail4)=%%" required %%=v(@disabled)=%%>
</div>
<div class="col-md-6">
<label for="inputFullName" class="form-label">Full Name</label>
<input type="text" class="form-control"
id="inputFullName" name="inputFullName"
value="%%=v(@inputFullName)=%%" required %%=v(@disabled)=%%>
</div>
<div class="col-12">
<label for="inputAddress" class="form-label">Address</label>
<input type="text" class="form-control" id="inputAddress"
name="inputAddress" placeholder="1234 Main St"
value="%%=v(@inputAddress)=%%" %%=v(@disabled)=%%>
</div>
<div class="col-12">
<label for="inputAddress2" class="form-label">Address 2</label>
<input type="text" class="form-control" id="inputAddress2"
name="inputAddress2" placeholder="Apartment, studio, or floor"
value="%%=v(@inputAddress2)=%%" %%=v(@disabled)=%%>
</div>
<div class="col-md-6">
<label for="inputCity" class="form-label">City</label>
<input type="text" class="form-control" id="inputCity"
name="inputCity" value="%%=v(@inputCity)=%%"
required %%=v(@disabled)=%%>
</div>
<div class="col-md-2">
<label for="inputZip" class="form-label">Zip</label>
<input type="text" class="form-control" id="inputZip"
name="inputZip" value="%%=v(@inputZip)=%%"
required %%=v(@disabled)=%%>
</div>
<div class="col-12">
<div class="form-check">
<input class="form-check-input" type="checkbox"
id="gridCheck" name="gridCheck"
value="%%=v(@gridCheck)=%%" %%=v(@disabled)=%%>
<label class="form-check-label" for="gridCheck">
Email Consent
</label>
</div>
</div>
<div class="col-12">
<button type="submit" class="btn btn-primary">Submit</button>
</div>
</form>
Step 3:
Right click on html and click on format html and publish the page. Run the URL and check your form design.
Step 4:
Create a data extension to store the subscriber details

Step 5:
Add the below AMPScript code block
%%[
/*-----Start Initialize the variables----------------*/
set @mid = AttributeValue('memberid')
set @inputEmail4=RequestParameter('inputEmail4')
set @inputFullName=RequestParameter('inputFullName')
set @inputAddress=RequestParameter('inputAddress')
set @inputAddress2=RequestParameter('inputAddress2')
set @inputCity=RequestParameter('inputCity')
set @inputZip=RequestParameter('inputZip')
set @gridCheck=RequestParameter('gridCheck')
/*---------------------End-----------------------------*/
]%%
AttributeValue('memberid') > Will fetch MID
RequestParameter('inputEmail4') > Will fetch form control data value from attribute name "inputEmail4"
on page load call: [From here]
<input type="email" class="form-control"
id="inputEmail4" name="inputEmail4"
value="%%=v(@inputEmail4)=%%" required %%=v(@disabled)=%%>
Full AMPScript block :
%%[
/*-----Start Initialize the variables----------------*/
set @mid = AttributeValue('memberid')
set @inputEmail4=RequestParameter('inputEmail4')
set @inputFullName=RequestParameter('inputFullName')
set @inputAddress=RequestParameter('inputAddress')
set @inputAddress2=RequestParameter('inputAddress2')
set @inputCity=RequestParameter('inputCity')
set @inputZip=RequestParameter('inputZip')
set @gridCheck=RequestParameter('gridCheck')
/*---------------------End-----------------------------*/
/*
Validate if the required inputs are supplied
before saving into the data extension
here we are using UPSERTDATA function to update our data extension ["Master DE"]
*/
if not empty(@inputEmail4) then
set @res=UpsertData(
'MasterDE',1,
'Email',@inputEmail4,
'FullName',@inputFullName,
'Address',@inputAddress,
'Address2',@inputAddress2,
'City',@inputCity,
'Zip',@inputZip,
'EmailConsent',@gridCheck,
'MID',@mid
)
set @message1="Submitted Successfully! "
set @message2="You will receive email shortly."
else
set @hidden="hidden"
endif
]%%
Step 6 :
Publish the cloud page and run it. Add the form details and click submit


Validate if the data was pushed into the data extension [Master DE]


Comments
Post a Comment