
Accelerating Customer Engagement: Building Customer Journeys with REST API and Server-Side JavaScript (SSJS) Integration
Introduction:
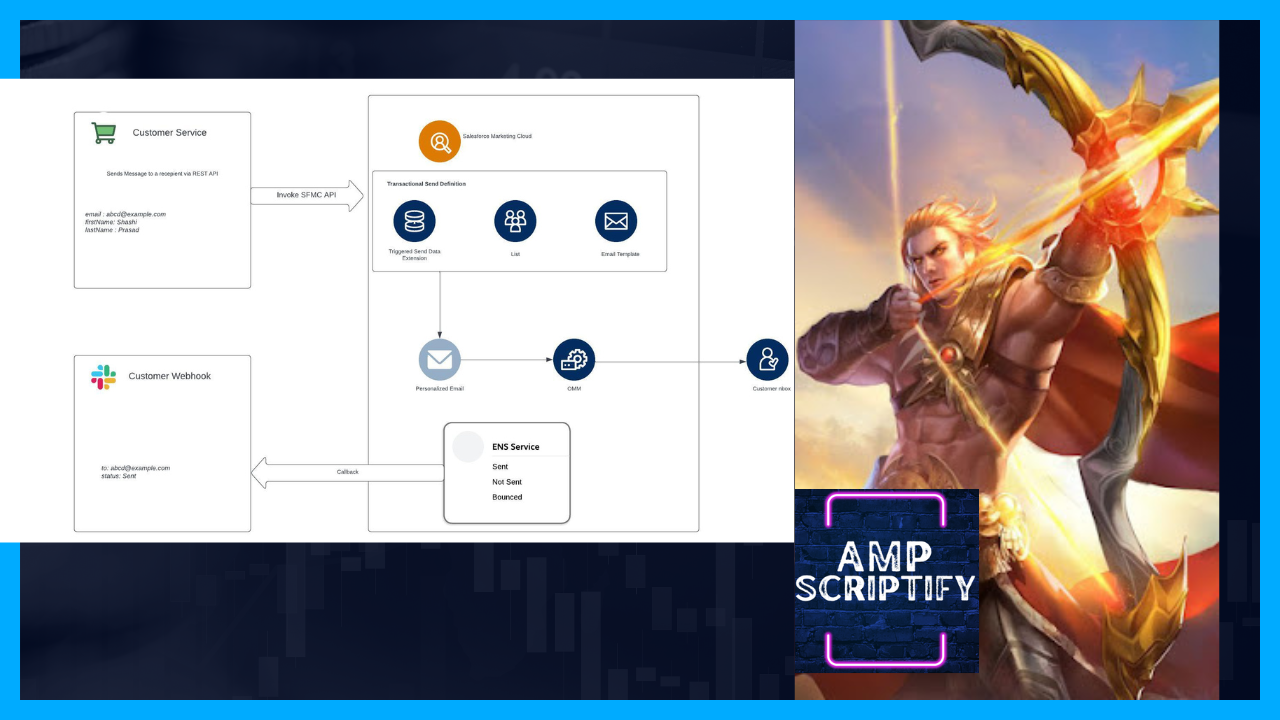
Welcome to the tutorial for leveraging the power of Server-Side JavaScript (SSJS) and REST API integration to create dynamic and personalized customer journeys. This guide will walk you through the process of utilizing SSJS in conjunction with the REST API to design and automate customer journeys within your marketing platform. By combining these technologies, you can deliver tailored experiences, enhance customer engagement, and drive meaningful interactions.
Throughout this tutorial, we will provide detailed instructions, code snippets, and best practices to guide you through the process of building customer journeys using REST API and Server-Side JavaScript (SSJS) integration. By following these guidelines, you will be equipped with the knowledge and tools to create personalized, automated, and impactful customer experiences. Let's begin the journey of elevating your marketing efforts with the combined power of REST API and SSJS integration.
1. Overview
- Understanding Journey Specifications
Host: https://YOUR_SUBDOMAIN.rest.marketingcloudapis.com
POST /interaction/v1/interactions
Content-Type: application/json
Authorization: Bearer YOUR_ACCESS_TOKEN

{
    "key": "ixn-created-via-the-api",
    "name": "API-Created journey",
    "workflowApiVersion": 1.0 ,
    "triggers": [],
    "goals": [],
    "activities": []
}
2. Getting Started
- Prerequisites for REST API and SSJS integration
>> Read my blog on REST API CLICK HERE - Setting up authentication and API access
>> Read my blog on MODULAR DESIGN CLICK HERE
3. Using REST API for Journey Creation
- Overview of REST API endpoints for journey management:
As discussed in my MODULAR DESIGN blog HERE. We added interactions end-points as shown below in APIMethods DE

- Designing journey SSJS Code Snippets
Code Snippet - RESTAPIPOST
<script runat="server">
  function InvokeRESTAPI(installPackageConfig,accessTokenConfig,methodAPIConfig,payload,key)
  {
    // Call AccessToken function to retrieve for Access Token
    var accessTokenResult=AccessToken(installPackageConfig,accessTokenConfig);
    var statusCode = accessTokenResult["StatusCode"];
    var response = accessTokenResult["Response"][0];
    var accessToken = Platform.Function.ParseJSON(response).access_token;
    var tokenType = Platform.Function.ParseJSON(response).token_type;
    //Write("Access Token :" + tokenType + " " +accessToken +"\n");

    var httpHeadersName=["Authorization"];
    var httpHeaderValues=[tokenType + " " +accessToken];

    // Call DataExtensionRowsRetrieve function to retrieve for API Config
    var APIConfiDE=DataExtensionRowsRetrieve(installPackageConfig);
    var restAPI=APIConfiDE[0]["RESTAPI"];

    // Call DataExtensionRowsRetrieve function to retrieve for APIMethod Config
    var APIMethodDE=DataExtensionRowsRetrieve(methodAPIConfig);
    var httpProtocol = APIMethodDE[0]["HttpProtocol"];
    var methodURL = APIMethodDE[0]["MethodURL"];
    var methodURL_1 = APIMethodDE[0]["MethodURL_1"];
    var methodURL_2 = APIMethodDE[0]["MethodURL_2"];
    var contentType = "application/json;charset=UTF-8";
    if(methodURL_1)
    {
      var URL=restAPI+methodURL+methodURL_1.replace("{configKey}",key);
    }
    else
    {
      var URL=restAPI+methodURL;
    }
    //Write('\n' + URL + '\n' );

    var postPayload=payload;
    //Write('\n' + Stringify(postPayload) + '\n'  );

    var httpResponse =HTTP.Post(URL,contentType,Stringify(postPayload),httpHeadersName,httpHeaderValues);

    return httpResponse;
  }
</script>
Code Snippet - GetCategoryIDForJourney<script runat="server"> function GetCategoryIDForJourney() { var filter1={ Property:"Name",SimpleOperator:"equals",Value:"Shashi"}; var filter2={ Property:"ContentType",SimpleOperator:"equals",Value:"journey"}; var complexFilter = { LeftOperand: filter1,LogicalOperator: "AND",RightOperand: filter2}; var results = Folder.Retrieve(complexFilter); return results[0].ID; } </script>Example :Create Interaction (Journey) - Basic Shell<script runat="server" > Platform.Load("core", "1"); var contentDE = Platform.Function.ContentBlockByKey("DataExtensionRowsRetrieve"); var contentSimpleOperators = Platform.Function.ContentBlockByKey("SimpleOperators"); var contentAccessToken = Platform.Function.ContentBlockByKey("AccessToken"); var contentRESTAPIPOST = Platform.Function.ContentBlockByKey("RESTAPIPOST"); var contentDefineDataExtensionRetrieve = Platform.Function.ContentBlockByKey("DefineDataExtensionRetrieve"); var journeyCategory=Platform.Function.ContentBlockByKey("GetCategoryIDForJourney"); try{ // Define properties for API Config var installPackageConfig=DefineDataExtensionRetrieve("APIConfig","Equals","TransactionalAPI","InstallPackages"); // Define properties for Access token var accessTokenConfig=DefineDataExtensionRetrieve("MethodName","Equals","Request SFMC Token","APIMethod"); // Define properties for REST API Method call var methodAPIConfig=DefineDataExtensionRetrieve("MethodName","Equals","Create Interaction (Journey) - Basic Shell","APIMethod"); var payload={ "key": "journey-created-via-the-api-shashi", "name": "API-Created journey version1", "workflowApiVersion": 1, "categoryId":GetCategoryIDForJourney(), "triggers": [], "goals": [], "activities": [] } var key="{{UpdateThis}}"; var restResponse=InvokeRESTAPI(installPackageConfig,accessTokenConfig,methodAPIConfig,payload,key); Write(Stringify(restResponse)); } catch(ex) { var APIExceptionDE = DataExtension.Init("APIException"); APIExceptionDE.Rows.Add( { Message:ex.message ,Description:ex.description ,InnerException:ex.jintException ,FunctionName:"Main Block" } ); Write(ex.message + '\n'); Write(ex.description + '\n'); Write(ex.jintException + '\n'); } </script>Example :Create Interaction (Journey) - Entry Event Only<script runat="server" > Platform.Load("core", "1"); var contentDE = Platform.Function.ContentBlockByKey("DataExtensionRowsRetrieve"); var contentSimpleOperators = Platform.Function.ContentBlockByKey("SimpleOperators"); var contentAccessToken = Platform.Function.ContentBlockByKey("AccessToken"); var contentRESTAPIPOST = Platform.Function.ContentBlockByKey("RESTAPIPOST"); var contentDefineDataExtensionRetrieve = Platform.Function.ContentBlockByKey("DefineDataExtensionRetrieve"); var journeyCategory=Platform.Function.ContentBlockByKey("GetCategoryIDForJourney"); try{ // Define properties for API Config var installPackageConfig=DefineDataExtensionRetrieve("APIConfig","Equals","TransactionalAPI","InstallPackages"); // Define properties for Access token var accessTokenConfig=DefineDataExtensionRetrieve("MethodName","Equals","Request SFMC Token","APIMethod"); // Define properties for REST API Method call var methodAPIConfig=DefineDataExtensionRetrieve("MethodName","Equals","Entry Event Only","APIMethod"); var payload={ "key": "journey-created-via-the-api-2", "name": "This is our journey 2", "description": "We are using this journey to learn how to use the Journey Spec in Journey Builder", "categoryId":GetCategoryIDForJourney(), "workflowApiVersion": 1, "triggers": [ { "key": "event-key", "name": "Starting point for the journey", "type": "APIEvent", "eventDefinitionKey": "APIEvent-c204d5ab-543c-56de-f7f2-75c2f9220411", "arguments": {}, "configurationArguments": {} } ] } var key="{{UpdateThis}}"; var restResponse=InvokeRESTAPI(installPackageConfig,accessTokenConfig,methodAPIConfig,payload,key); Write(Stringify(restResponse)); } catch(ex) { var APIExceptionDE = DataExtension.Init("APIException"); APIExceptionDE.Rows.Add( { Message:ex.message ,Description:ex.description ,InnerException:ex.jintException ,FunctionName:"Main Block" } ); Write(ex.message + '\n'); Write(ex.description + '\n'); Write(ex.jintException + '\n'); } </script>Example :Create Interaction (Journey) - Simple Journey<script runat="server" > Platform.Load("core", "1"); var contentDE = Platform.Function.ContentBlockByKey("DataExtensionRowsRetrieve"); var contentSimpleOperators = Platform.Function.ContentBlockByKey("SimpleOperators"); var contentAccessToken = Platform.Function.ContentBlockByKey("AccessToken"); var contentRESTAPIPOST = Platform.Function.ContentBlockByKey("RESTAPIPOST"); var contentDefineDataExtensionRetrieve = Platform.Function.ContentBlockByKey("DefineDataExtensionRetrieve"); var journeyCategory=Platform.Function.ContentBlockByKey("GetCategoryIDForJourney"); var getJourneyPayload=Platform.Function.ContentBlockByKey("GetJourneyPayload"); try{ // Define properties for API Config var installPackageConfig=DefineDataExtensionRetrieve("APIConfig","Equals","TransactionalAPI","InstallPackages"); // Define properties for Access token var accessTokenConfig=DefineDataExtensionRetrieve("MethodName","Equals","Request SFMC Token","APIMethod"); // Define properties for REST API Method call var methodAPIConfig=DefineDataExtensionRetrieve("MethodName","Equals","Create Interaction","APIMethod"); var journeyKey="SSJS-Created journey version1"; var journeyName="SSJS-Created journey version"; var description="SSJS-Created journey version"; var payload=GetJourneyPayload(journeyKey,journeyName,description); var key="{{UpdateThis}}"; var restResponse=InvokeRESTAPI(installPackageConfig,accessTokenConfig,methodAPIConfig,payload,key); Write(Stringify(restResponse)); } catch(ex) { var APIExceptionDE = DataExtension.Init("APIException"); APIExceptionDE.Rows.Add( { Message:ex.message ,Description:ex.description ,InnerException:ex.jintException ,FunctionName:"Main Block" } ); Write(ex.message + '\n'); Write(ex.description + '\n'); Write(ex.jintException + '\n'); } </script> - Configuring journey activities and wait activities
<script runat="server">
  function GetJourneyPayload(journeyKey,journeyName,description)
  {
    var jb_payload={
        "key": journeyKey,
        "name": journeyName,
        "description":description,
        "entryMode": "MultipleEntries",
        "categoryId":GetCategoryIDForJourney(),
        "workflowApiVersion": 1,
        "triggers": [
            {
                "key": "TRIGGER",
                "name": "api-event",
                "description": "",
                "type": "APIEvent",
                "outcomes": [],
                "arguments": {},
                "configurationArguments": {
                    "criteria": ""
                }
            }
        ],
        "goals": [],
        "activities": [
            {
                "key": "postman-email-key-1",
                "name": "Welcome Email",
                "description": "",
                "type": "EMAILV2",
                "outcomes": [
                    {
                        "key": "sent-email-now-wait",
                        "next": "welcome-email-then-wait",
                        "arguments": {},
                        "metaData": {}
                    }
                ],
                "arguments": {},
                "configurationArguments": {
                    "applicationExtensionKey": "jb-email-activity",
                    "triggeredSend": {
                        "emailId": 287896,
                        "emailSubject": "Hello World!",
                        "name": "TransactionalAPI",
                        "isSalesforceTracking": true,
                        "isMultipart": true,
                        "isSendLogging": true,
                        "suppressTracking": false,
                        "isTrackingClicks": true
                    }
                },
                "metaData": {
                    "isConfigured": true
                }
            },
            {
                "key": "welcome-email-then-wait",
                "name": "1 minute",
                "type": "WAIT",
                "configurationArguments": {
                    "waitDuration": 1,
                    "waitUnit": "MINUTES"
                },
                "metaData": {
                    "isConfigured": true,
                    "waitType": "duration"
                }
            }
        ]
    }

    return jb_payload;
  }
</script>
4. Conclusion
- Recap of the benefits and possibilities of REST API and SSJS integration
In this tutorial, we explored how to create a modular and automated approach for building a Marketing Cloud journey using Server-Side JavaScript (SSJS) and REST API. By following the step-by-step instructions, you have learned how to construct a basic shell, define a simple entry source, and design a multistep journey.
The tutorial emphasized the importance of modularity, allowing for easy scalability and automation. By breaking down the journey into separate components, you can efficiently manage and update each module without impacting the entire journey. This modular approach also enables seamless integration with automation processes, reducing manual efforts and enhancing efficiency.
By implementing this modular and automated approach, you have the ability to adapt and scale your marketing journeys to meet evolving business needs. Additionally, automation enables you to schedule and trigger journeys based on specific events, providing timely and targeted interactions with your customers.
Remember to follow best practices for security and compliance, ensuring data privacy and adhering to regulatory requirements throughout the journey creation and automation process.
- Final thoughts and next steps for implementing dynamic customer journeys
While the modular and automated approach for building Marketing Cloud journeys using SSJS via REST API offers flexibility and scalability, it's important to recognize that journey specification can become quite complex. As journeys grow in sophistication and involve intricate decision-making, creating complex journeys solely through code can become challenging to maintain and visualize.
In such cases, leveraging the visual interface of Journey Builder within Marketing Cloud provides several advantages. The user-friendly UI empowers marketers and campaign managers to design complex journeys using a drag-and-drop interface, without the need for extensive coding or scripting. This approach offers the following benefits:
- Simplicity and Ease of Use: The UI-based approach simplifies the process of journey creation by providing a visual canvas where marketers can easily define and configure journey components. This reduces the learning curve and allows teams to quickly grasp the journey's structure and flow.
- Visual Representation: The visual interface offers an intuitive representation of the journey's logic, making it easier to understand the overall customer experience. Marketers can visualize the different stages, decision points, and interactions, allowing for better collaboration and communication within the team.
- Real-time Testing and Optimization: Journey Builder's UI allows for immediate testing and optimization of complex journeys. Marketers can preview and simulate customer interactions, identify potential bottlenecks or gaps, and make adjustments in real-time. This iterative approach ensures journeys are fine-tuned for optimal performance before they go live.
- Integration with Journey Analytics: Journey Builder seamlessly integrates with Journey Analytics, enabling marketers to track and analyze the performance of complex journeys. This provides valuable insights into customer behavior, engagement metrics, and conversion rates, allowing for data-driven decision-making and ongoing optimization.
While the modular and automated approach using SSJS via REST API is still valuable for specific use cases, leveraging the UI in Journey Builder for complex journey creation offers a more accessible and user-friendly experience. It empowers marketers to take full control of their campaigns, streamlines collaboration, and provides real-time insights for continuous improvement.
Ultimately, the choice between using code-based automation or the UI-based approach depends on the complexity of your journey and the technical capabilities of your team. Consider the specific requirements of your marketing initiatives and strike the right balance between automation and ease of use to achieve optimal results.
If you want to play around and learn more :
<script runat="server">

  function DefineTriggers(key,name,description,type,outcomes,arguments,configurationArguments)
  {
    var tr_payload=[{
        "key": key,
        "name": name,
        "description":description,
        "type": type,
        "outcomes": outcomes,
        "arguments":arguments,
        "configurationArguments": configurationArguments
    }]
    return tr_payload;
  }

  function DefineGoals()
  {
    var goals=[];
    return goals;
  }

  function DefineActivities()
  {
    var activities=[];
    return activities;
  }

  function DefineEmailActivity(key,name,description,outcomes,arguments,configurationArguments,metaData)
  {
    var email_activity={
    "key": "postman-email-key-1",
    "name": "Welcome Email",
    "description": "",
    "type": "EMAILV2",
    "outcomes": outcomes,
    "arguments": arguments,
    "configurationArguments":configurationArguments,
    "metaData": metaData
    }
    return email_activity;
  }

  function DefineEmailOutcomes()
  {
    var outcomes=[];
    return outcomes;
  }

  function DefineEmailOutcome(key, next)
  {
    var email_outcome={
        "key": key,
        "next": next,
        "arguments": {},
        "metaData": {}
    }
    return email_outcome;
  }

  function DefineConfigurationArgumentsEmail(applicationExtensionKey,triggeredSend)
  {
    var config_arg={
        "applicationExtensionKey": applicationExtensionKey,
        "triggeredSend":triggeredSend
    }
    return config_arg;
  }

  function DefineTriggeredSends()
  {
        var triggeredsends={
            "emailId": 287896,
            "emailSubject": "Hello World!",
            "name": "TransactionalAPI",
            "isSalesforceTracking": true,
            "isMultipart": true,
            "isSendLogging": true,
            "suppressTracking": false,
            "isTrackingClicks": true
        }
        retun triggeredsends;
  }

  function DefineMetaDataEmail()
  {
    var metadata={
        "isConfigured": true
    }
    return metadata;
  }

  function DefineWaitActivity(key,name,configurationArguments,metaData)
  {
    var wait_activity={
        "key": key,
        "name": name,
        "type": "WAIT",
        "configurationArguments":configurationArguments,
        "metaData":metaData
    }
    return wait_activity;
  }

  function DefineConfigurationArgumentsWait(waitDuration,waitUnit)
  {
        var config={
            "waitDuration": waitDuration,
            "waitUnit": waitUnit
        }
        return config;
  }

  function DefineMetaDataWait()
  {
    var metadata={
        "isConfigured": true,
        "waitType": "duration"
    }
    return metadata;
  }

</script>
<script runat="server">

var outcomes=[];
var arguments={};
var configurationArguments={
    "criteria": ""
};
var triggers=DefineTriggers("TRIGGER","api-event","api-event","APIEvent",outcomes,arguments,configurationArguments);

var outcome=DefineEmailOutcome("sent-email-now-wait", "welcome-email-then-wait");
var outcomes=[outcome];
var arguments={};
var applicationExtensionKey="jb-email-activity";
var triggeredSend=DefineTriggeredSends();
var configurationArguments=DefineConfigurationArgumentsEmail(applicationExtensionKey,triggeredSend);
var metaData=DefineMetaDataEmail();
var email_activity=DefineEmailActivity("email-key-1","Welcome Email","Welcome Email",outcomes,arguments,configurationArguments,metaData);

var waitDuration=1;
var waitUnit="MINUTES";
var configurationArguments=DefineConfigurationArgumentsWait(waitDuration,waitUnit);
var metaData=DefineMetaDataWait();
var wait_activity=DefineWaitActivity("welcome-email-then-wait","1 minute",configurationArguments,metaData);
var activities=[email_activity,wait_activity];

var activities="";
var journeyPayload={
    "key":"Shashi-ssjs-demo",
    "name": "Shashi-ssjs-demo",
    "description": "Shashi-ssjs-demo",
    "categoryId":GetCategoryIDForJourney(),
    "entryMode": "MultipleEntries",
    "triggers":triggers,
    "goals": [],
    "activities":activities
}
</script>


Comments
Post a Comment