
Introducing WS-Proxy Create Method in SFMC:


Use Case
Description: This use case describes the process of creating data views data extensions in Salesforce Marketing Cloud using the "Data View AMP Scriptify" custom app from the AppExchange. This app provides enhanced capabilities for data extension creation and management.
Actors:
- Marketers: The user with administrative privileges responsible for managing data extensions and data views in Marketing Cloud.
Preconditions:
- The Marketers has installed the "Data View AMP Scriptify" custom app from the AppExchange.
- The Marketers has the necessary permissions to create data extensions.
- The Marketing Cloud account is set up and accessible.
Main Flow:
- The Marketers logs in to the Marketing Cloud account.
- The Admin navigates to the "AppExchange" tab in the Marketing Cloud dashboard.
- The Marketing Cloud displays a list of installed custom apps, including "Data View AMP Scriptify."
- The Admin selects the "Data View AMP Scriptify" custom app from the list.
- The custom app interface loads, providing advanced data extension management options.
- Within the "Data View AMP Scriptify" app, the Admin selects the checkboxes for the data views they want to create. These checkboxes represent predefined data views that come with the app and offer specific functionalities or data configurations.
- The app may provide additional options or settings related to the selected data views, which the Admin can configure as needed.
- The Admin clicks on the "Create New Data Extension" button within the app after selecting the desired data views.
- The app prompts the Admin to provide the following information for the new data extension:
- Data Extension Name: A unique and descriptive name for the data extension.
- External Key: An optional external key for easy reference and integration purposes.
- Fields: Defines the fields/columns to be included in the data extension, along with their data types and attributes.
- Data Retention Policy: Specifies how long the data in the data extension should be retained.
- Primary Key: Specifies the primary key field that uniquely identifies each record in the data extension.
- Data Extension Type: Selects the appropriate data extension type, such as Standard or Filtered.
- Sharing Settings: Determines the sharing permissions for the data extension.
- The Admin reviews the provided information and ensures the accuracy of the data extension configuration.
- The Admin clicks on the "Create Data Extension" button within the app to create the data extension.
- The "Data View AMP Scriptify" app validates the data extension configuration and communicates with Marketing Cloud to create the new data extension with the specified settings, including the selected data views.
Postconditions:
- The Marketers successfully creates the new data extension using the "Data View AMP Scriptify" custom app, including the selected data views.
- The data extension, along with the associated data views, is now available for use in various Marketing Cloud functionalities, such as data import, segmentation, and automation activities.
Note: This use case provides an overview of the process to create data views data extensions in Salesforce Marketing Cloud using the "Data View AMP Scriptify" custom app from the AppExchange. The actual steps and configuration options may vary depending on the specific version and setup of the custom app. It is essential to refer to the official documentation and user guides for accurate and up-to-date instructions.
Solution Documentation
This solution documentation outlines the process of creating data views data extensions in Salesforce Marketing Cloud using the "Data View AMP Scriptify" custom app from the AppExchange. The "Data View AMP Scriptify" app provides advanced data extension management capabilities, including the ability to select predefined data views for enhanced functionalities.
Prerequisites
- A Salesforce Marketing Cloud account with administrative privileges.
- Installation of the "Data View AMP Scriptify" custom app from the AppExchange.
Step-by-Step Guide
- Log in to Salesforce Marketing Cloud
- Access the AppExchange Tab
- Find "Data View AMP Scriptify" App
- Launch "Data View AMP Scriptify" App
- Select Data Views to Create
- Configure Additional Options (Optional)
- Initiate Data Extension Creation
- Provide Data Extension Details
- Data Extension Name: Enter a unique and descriptive name for the data extension.
- External Key (Optional): Define an external key for easy reference and integration purposes.
- Fields: Specify the fields/columns to be included in the data extension, along with their data types and attributes.
- Data Retention Policy: Set the data retention period for the data extension.
- Primary Key: Specify the primary key field that uniquely identifies each record in the data extension.
- Data Extension Type: Select the appropriate data extension type, such as Standard or Filtered.
- Sharing Settings: Determine the sharing permissions for the data extension.
- Review Configuration and Confirm
- Create Data Extension
- Validation and Communication with Marketing Cloud
Ensure that you have the necessary login credentials to access the Marketing Cloud account.
Once logged in, navigate to the "AppExchange" tab in the Marketing Cloud dashboard.
In the AppExchange tab, you will see a list of installed custom apps. Locate and select the "Data View AMP Scriptify" custom app from the list.
Click on the "Data View AMP Scriptify" app to launch its interface, which provides advanced data extension management options.
Within the "Data View AMP Scriptify" app, you will find a list of available data views represented by checkboxes. Select the checkboxes corresponding to the data views you wish to create. Each data view offers specific functionalities or data configurations.
The "Data View AMP Scriptify" app may provide additional options or settings related to the selected data views. You can configure these options as needed for your data extension.
After selecting the desired data views and configuring additional options, click on the "Create New Data Extension" button within the app.
The app will prompt you to provide the following information for the new data extension:
Carefully review the provided information to ensure the accuracy of the data extension configuration.
Click on the "Create Data Extension" button within the app to initiate the data extension creation process.
The "Data View AMP Scriptify" app will validate the data extension configuration and communicate with Marketing Cloud to create the new data extension with the specified settings, including the selected data views.
Post-creation Steps
- After successfully creating the data extension, it will be available for use in various Marketing Cloud functionalities, such as data import, segmentation, and automation activities.
- Ensure to keep track of the created data extensions and their associated data views for future reference and maintenance.
Technical know-how
Introduction:
Salesforce Marketing Cloud is a robust platform that empowers businesses to engage with customers on a personalized level, deliver targeted messages, and drive successful marketing campaigns. To maintain a competitive edge in today's fast-paced digital landscape, real-time data integration becomes crucial. The WebSocket Proxy (ws-proxy) Create Method is a powerful feature introduced in Salesforce Marketing Cloud, providing developers with the ability to seamlessly integrate real-time data from external sources into their Marketing Cloud journeys. In this blog, we will explore the key functionalities of the createItem and createBatch methods, and how they can revolutionize your marketing efforts.
Understanding WebSocket Proxy:
The WebSocket Proxy (ws-proxy) is a technology that facilitates bidirectional communication channels between a client and a server. This enables the seamless exchange of data in real-time without the need for traditional HTTP polling mechanisms. With the introduction of the ws-proxy create method, Salesforce Marketing Cloud now offers an efficient and scalable way to connect with external systems and synchronize data seamlessly.

1. createItem Method:
The createItem method is designed to handle individual data items and is ideal for scenarios where you need to send real-time updates or events to Marketing Cloud. This could include events like abandoned carts, lead conversions, user interactions, or any other critical data point that you want to leverage for immediate customer engagement.
The process for using the createItem method involves:
- Establishing a WebSocket connection: Your external system initiates a WebSocket connection with the Marketing Cloud server using a secure endpoint.
- Sending data as JSON: Once the connection is established, you can send individual data items to the Marketing Cloud server in JSON format. The data should follow the structure defined in your Marketing Cloud data extension.
- Real-time updates: As soon as the data item is received and processed by Marketing Cloud, it can trigger immediate actions in your marketing journeys, such as sending personalized emails, updating subscriber preferences, or triggering automation rules.
The createItem method is especially useful for capturing time-sensitive events, ensuring your customer engagement remains timely and relevant.


2. createBatch Method:
While the createItem method handles individual data items, the createBatch method allows you to send multiple data items in a single payload. This is advantageous when you want to synchronize large datasets or perform bulk updates within Marketing Cloud. The createBatch method streamlines the data transfer process, reducing the number of WebSocket connections required and improving overall performance.
The steps for using the createBatch method include:
- Bundling data into batches: Before initiating the WebSocket connection, you package multiple data items into a JSON array, creating a batch of data that requires synchronization with Marketing Cloud.
- Submitting the batch: Once the WebSocket connection is established, you send the batch of data to the Marketing Cloud server, where it is processed efficiently.
- Optimizing data sync: By sending data in batches, you can significantly reduce the overhead associated with establishing multiple connections, resulting in a more streamlined and responsive integration.

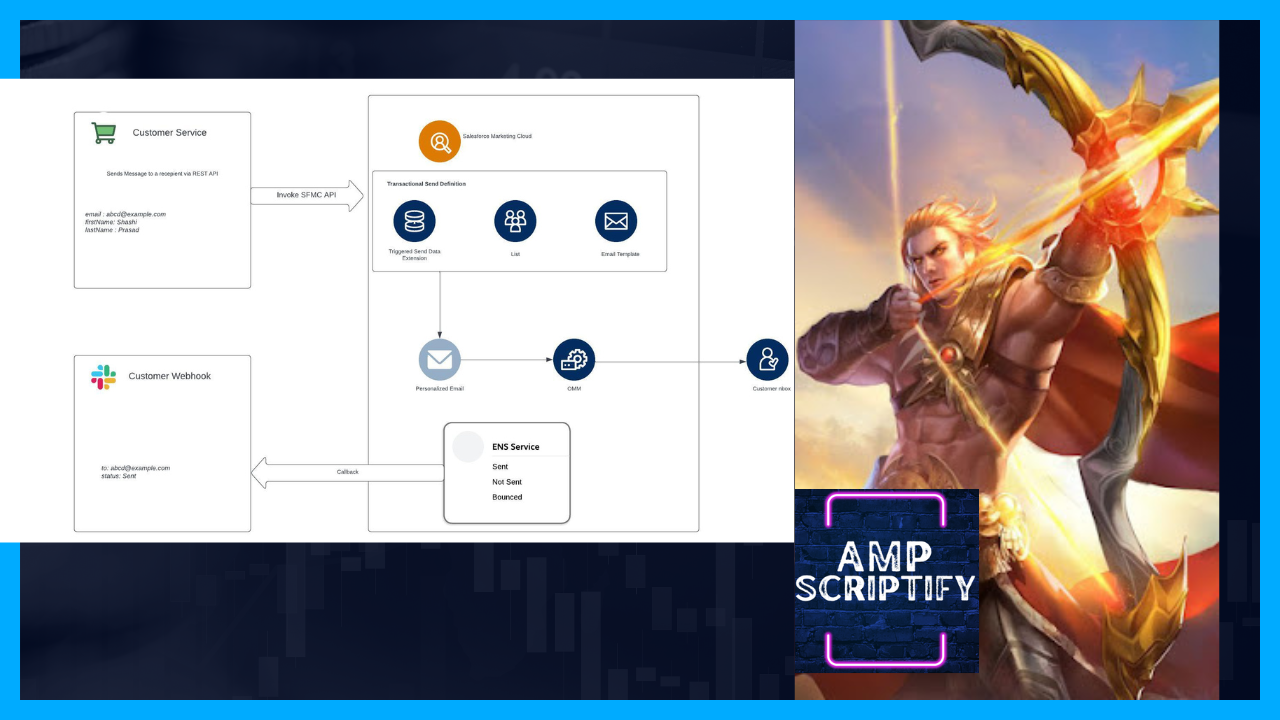
3. Data Flow Diagram

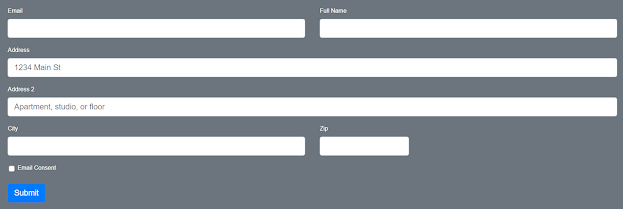
3. HTML Form for Cloud Page
  <form action="%%=RequestParameter('PAGEURL')=%%"  method="post" class="needs-validation" >
          <div class="mb-3">
            <label><strong>Create:</strong></label>
            <br>
            <div class="form-check">
              <input type="checkbox" id="sentDataView" name="sentDataView" value="sentDataView"
                     class="form-check-input" aria-describedby="invalidCheck3Feedback" required>
              <label for="sentDataView" class="form-check-label">Sent</label>
            </div>
            <div class="form-check">
              <input type="checkbox" id="openDataView" name="openDataView" value="openDataView"
                     class="form-check-input">
              <label for="openDataView" class="form-check-label">Open</label>
            </div>
            <div class="form-check">
              <input type="checkbox" id="clickDataView" name="clickDataView" value="clickDataView"
                     class="form-check-input">
              <label for="clickDataView" class="form-check-label">Click</label>
            </div>
            <div class="form-check">
              <input type="checkbox" id="bounceDataView" name="bounceDataView" value="bounceDataView"
                     class="form-check-input">
              <label for="bounceDataView" class="form-check-label">Bounce</label>
            </div>
            <!-- Add more checkboxes for additional data views as needed -->
          </div>
          <button type="submit" class="btn btn-outline-success">Submit</button>
        </form>
4. Create a Folder via WS-Proxy
 function CreateAfolder(name,customerkey,description,parentFolderCategoryID){
    // Create a new instance of WSProxy to interact with the SOAP object.
    var api = new Script.Util.WSProxy();

    var newFolder = {
      "Name" : name,
      "CustomerKey" : customerkey,
      "Description" : description,
      "ContentType" : "dataextension",
      "IsActive" : "true",
      "IsEditable" : "true",
      "AllowChildren" : "true",
      "ParentFolder": {"ID":parentFolderCategoryID}
    };

    var status = api.createItem("DataFolder", newFolder);
    return status;
  }
5. Data Views Configurations
function CreateSentDataViews(CategoryID)
  {
       var deObj = {
        "CustomerKey" : "Dataview_Sent",
        "Name" : "Dataview_Sent",
        "CategoryID":CategoryID,
        "Fields" : [
          { "Name" : "AccountID", "FieldType" : "Number" },
          { "Name" : "OYBAccountID", "FieldType" : "Number"},
          { "Name" : "JobID", "FieldType" : "Number" },
          { "Name" : "ListID", "FieldType" : "Number" },
          { "Name" : "BatchID", "FieldType" : "Number" },
          { "Name" : "SubscriberID", "FieldType" : "Number" },
          { "Name" : "SubscriberKey", "FieldType" : "Text", "MaxLength" : 254 },
          { "Name" : "EventDate", "FieldType" : "Date"},
          { "Name" : "Domain", "FieldType" : "Text","MaxLength" : 128},
          { "Name" : "TriggererSendDefinitionObjectID", "FieldType" : "Text","MaxLength" : 36},
          { "Name" : "TriggeredSendCustomerKey", "FieldType" : "Text","MaxLength" : 36}
        ]
    };

    return deObj;
  }

  function CreateOpenDataViews(CategoryID)
  {
       var deObj = {
        "CustomerKey" : "Dataview_Open",
        "Name" : "Dataview_Open",
        "CategoryID":CategoryID,
        "Fields" : [
          { "Name" : "AccountID", "FieldType" : "Number" },
          { "Name" : "OYBAccountID", "FieldType" : "Number"},
          { "Name" : "JobID", "FieldType" : "Number" },
          { "Name" : "ListID", "FieldType" : "Number" },
          { "Name" : "BatchID", "FieldType" : "Number" },
          { "Name" : "SubscriberID", "FieldType" : "Number" },
          { "Name" : "SubscriberKey", "FieldType" : "Text", "MaxLength" : 254 },
          { "Name" : "EventDate", "FieldType" : "Date"},
          { "Name" : "Domain", "FieldType" : "Text","MaxLength" : 128},
          { "Name" : "TriggererSendDefinitionObjectID", "FieldType" : "Text","MaxLength" : 36},
          { "Name" : "TriggeredSendCustomerKey", "FieldType" : "Text","MaxLength" : 36},
          { "Name" : "IsUnique", "FieldType" : "Boolean"}
        ]
    };

    return deObj;
  }


  function CreateClickDataViews(CategoryID)
  {
       var deObj = {
        "CustomerKey" : "Dataview_Click",
        "Name" : "Dataview_Click",
        "CategoryID":CategoryID,
        "Fields" : [
          { "Name" : "AccountID", "FieldType" : "Number" },
          { "Name" : "OYBAccountID", "FieldType" : "Number"},
          { "Name" : "JobID", "FieldType" : "Number" },
          { "Name" : "ListID", "FieldType" : "Number" },
          { "Name" : "BatchID", "FieldType" : "Number" },
          { "Name" : "SubscriberID", "FieldType" : "Number" },
          { "Name" : "SubscriberKey", "FieldType" : "Text", "MaxLength" : 254 },
          { "Name" : "EventDate", "FieldType" : "Date"},
          { "Name" : "Domain", "FieldType" : "Text","MaxLength" : 128},
          { "Name" : "TriggererSendDefinitionObjectID", "FieldType" : "Text","MaxLength" : 36},
          { "Name" : "TriggeredSendCustomerKey", "FieldType" : "Text","MaxLength" : 36},
          { "Name" : "IsUnique", "FieldType" : "Boolean"},
          { "Name" : "URL", "FieldType" : "Text","MaxLength" : 900},
          { "Name" : "LinkName", "FieldType" : "Text","MaxLength" : 1024},
          { "Name" : "LinkContent", "FieldType" : "Text"}
        ]
    };

    return deObj;
  }

  function CreateBounceDataViews(CategoryID)
  {
       var deObj = {
        "CustomerKey" : "Dataview_Bounce",
        "Name" : "Dataview_Bounce",
        "CategoryID":CategoryID,
        "Fields" : [
          { "Name" : "AccountID", "FieldType" : "Number" },
          { "Name" : "OYBAccountID", "FieldType" : "Number"},
          { "Name" : "JobID", "FieldType" : "Number" },
          { "Name" : "ListID", "FieldType" : "Number" },
          { "Name" : "BatchID", "FieldType" : "Number" },
          { "Name" : "SubscriberID", "FieldType" : "Number" },
          { "Name" : "SubscriberKey", "FieldType" : "Text", "MaxLength" : 254 },
          { "Name" : "EventDate", "FieldType" : "Date"},
          { "Name" : "Domain", "FieldType" : "Text","MaxLength" : 128},
          { "Name" : "TriggererSendDefinitionObjectID", "FieldType" : "Text","MaxLength" : 36},
          { "Name" : "TriggeredSendCustomerKey", "FieldType" : "Text","MaxLength" : 36},
          { "Name" : "IsUnique", "FieldType" : "Boolean"},
          { "Name" : "BounceCategoryID", "FieldType" : "Number" },
          { "Name" : "BounceCategory", "FieldType" : "Text","MaxLength" : 50},
          { "Name" : "BounceSubcategoryID", "FieldType" : "Number" },
          { "Name" : "BounceSubcategory", "FieldType" : "Text","MaxLength" : 50},
          { "Name" : "BounceTypeID", "FieldType" : "Number" },
          { "Name" : "BounceType", "FieldType" : "Text","MaxLength" : 50},
          { "Name" : "SMTPBounceReason", "FieldType" : "Text"},
          { "Name" : "SMTPMessage", "FieldType" : "Text"},
          { "Name" : "SMTPCode", "FieldType" : "Number" },
          { "Name" : "IsFalseBounce", "FieldType" : "Boolean"}
        ]
    };

    return deObj;
  }
6. WS-Proxy CreateBatch Method
 function CreateDataViews(dataViews){
    var api = new Script.Util.WSProxy();
    var response = api.createBatch("DataExtension", dataViews);
    return response;
  }
7. Main Function
<script runat="server">
      Platform.Load("core", "1");
      var method=Platform.Request.Method;
      try {
      if (method=="POST"){
        Variable.SetValue("@method","POST");
        var isSentDataView=Variable.GetValue("@sentDataView");
        var isOpenDataView=Variable.GetValue("@openDataView");
        var isClickDataView=Variable.GetValue("@clickDataView");
        var isBounceDataView=Variable.GetValue("@bounceDataView");

        var categoryID=RetrieveFolderID("Data Views");
        if (!categoryID){
        var parentFolderCategoryID=RetrieveFolderID("Data Extensions");
        var createDataFolder=CreateAfolder("Data Views","Data Views","Data Views",parentFolderCategoryID)
        categoryID=createDataFolder.Results[0].NewID;
        }

        var dataViews=[];
        if(isSentDataView)
        {
            var sentDataView=CreateSentDataViews(categoryID);
            dataViews.push(sentDataView);

        }
        if(isOpenDataView)
        {
            var openDataView=CreateOpenDataViews(categoryID);
            dataViews.push(openDataView);

        }
        if(isClickDataView)
        {
            var clickDataView=CreateClickDataViews(categoryID);
            dataViews.push(clickDataView);

        }
        if(isBounceDataView)
        {
            var bounceDataView=CreateBounceDataViews(categoryID);
            dataViews.push(bounceDataView);

        }

        var response=CreateDataViews(dataViews);
        var status=response.Status;
        var requestID=response.RequestID;
        var result= {"Status": status, "RequestID": requestID};
        var output=Stringify(result);
        Variable.SetValue("@status",status);
        Variable.SetValue("@result",output);
      }
      else{
        Variable.SetValue("@method","GET");
      }
    }
    catch (ex) {
  // If an exception occurs during the execution, catch it and write the error messages to the output.
  Write(ex.message + '\n');
  Write(ex.description + '\n');
  Write(ex.jintException + '\n');
}
</script>
Conclusion:
The WebSocket Proxy (ws-proxy) Create Method in Salesforce Marketing Cloud opens up a world of possibilities for real-time data integration. By using the createItem and createBatch methods, businesses can maintain an up-to-date view of customer interactions and rapidly respond with personalized marketing efforts. This enables marketers to deliver targeted messages, drive engagement, and boost customer loyalty.
In the dynamic landscape of modern marketing, leveraging real-time data integration has become a necessity. With the ws-proxy create method, Salesforce Marketing Cloud empowers businesses to stay ahead of the competition and forge stronger connections with their customers.


Comments
Post a Comment