
CLOUD PAGE ENABLEMENT - PART 4
USE CASE :
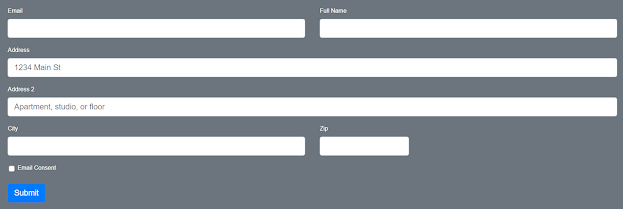
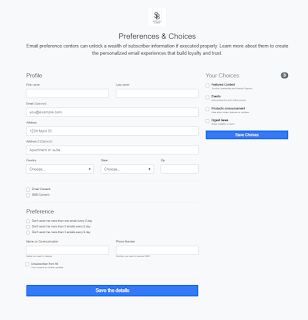
Create a cloud page to collect consent from subscribers.
1. Leverage content blocks to call AMPScript blocks and HTML blocks
2. Build custom CSS using code resource and leverage it in your cloud page
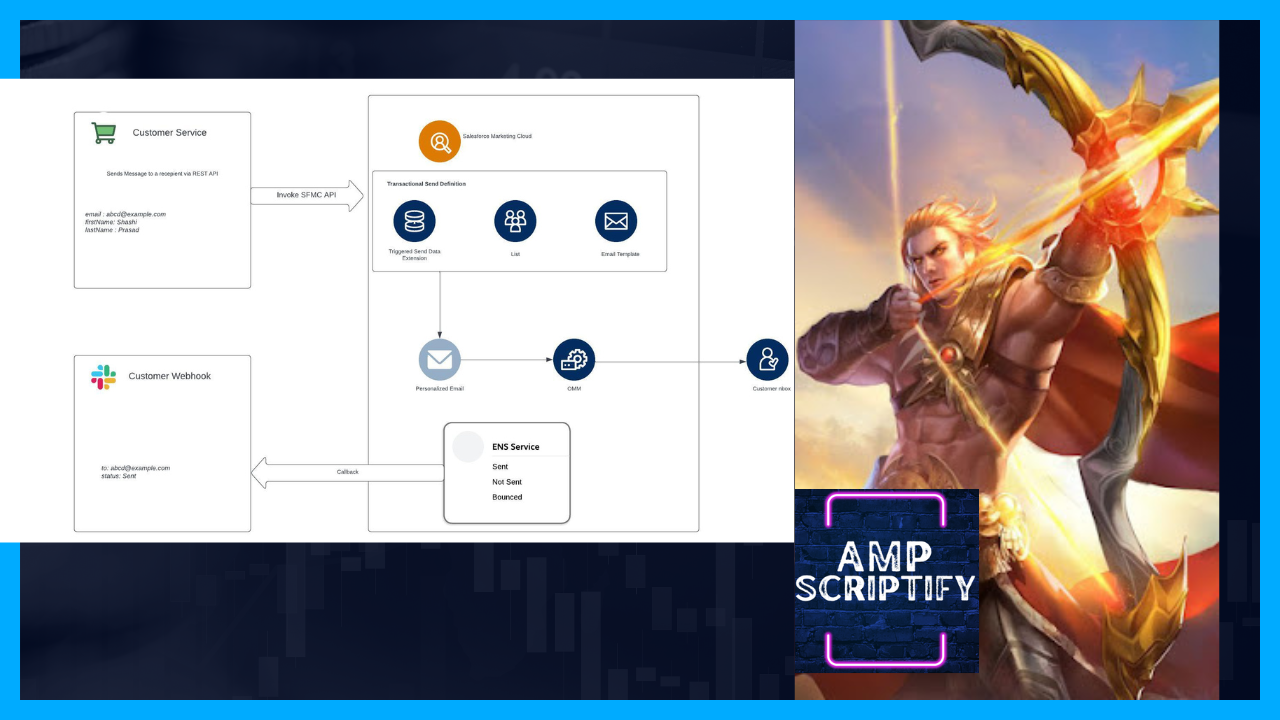
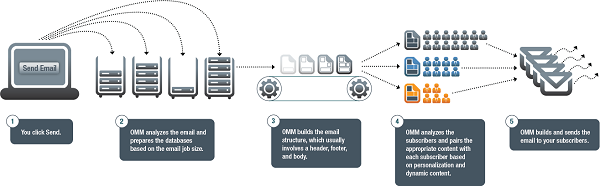
3. Leverage code resource and send email via trigger send
4. Built trigger send with SSJS via WS-Proxy SOAP API
In our part 1 and part 2 of this series we have learnt how to built cloud page with form controls using HTML content block and AMPScript block to Upsert data into data extension using code snippet content block.
If you want to recap , here are the links
1. Part 1
2. Part 2
In Part 3 of this series we learnt how to add custom css in our code resource and how to use them in our Consent Landing page.
Before proceeding further, I would request you to learn , these are pre-requisites
3. WS-Proxy
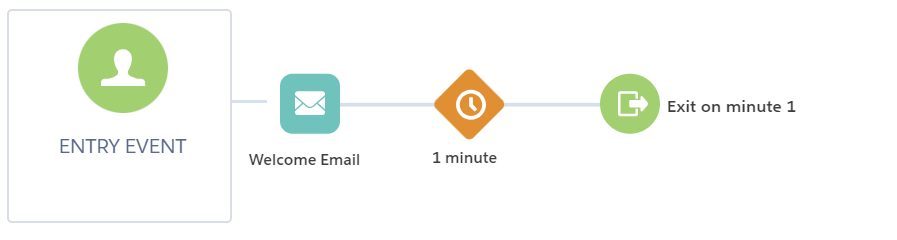
Step 1. Create Trigger Send

Step 2. Create JSON Code Resource


Step 3. Write SSJS via WS-Proxy to invoke Trigger Send
Pay load structure :
var tsDef = {
TriggeredSendDefinition: {
CustomerKey: tsExKey
}
,
Subscribers: [{
EmailAddress: EmailAddress,
SubscriberKey: SubscriberKey,
Attributes: [{
Name: 'firstName',
Value: firstName
}
]
}
]
};
%%[
/*-----Start Initialize the variables----------------*/
set @inputEmail4=RequestParameter('inputEmail4')
/*---------------------End-----------------------------*/
]%%
//pass Subscriber Key
var SubscriberKey = Platform.Function.GUID();
//pass First Name
var firstName = 'Shashi';
//pass Last Name
var lastName = 'Prasad';
Since the response for Ajax request would be JSON , we are preparing a JSON response at the end of the file
{
"status": "%%=v(@status)=%%",
"ErrorCode": "%%=v(@-ErrorCode)=%%",
"StatusMessage": "%%=v(@-StatusMessage)=%%"
}
Full Code :
<script runat="server">
Platform.Load("core",
"1.1");
var prox = new Script.Util.WSProxy();
</script>
%%[
/*-----Start Initialize the variables----------------*/
set @inputEmail4=RequestParameter('inputEmail4')
/*---------------------End-----------------------------*/
]%%
<script runat="server">
//provide Triggered Send External Key
var tsExKey = '25132';
//pass Email Address
var EmailAddress = Variable.GetValue("@inputEmail4");
//pass Subscriber Key
var SubscriberKey = Platform.Function.GUID();
//pass First Name
var firstName = 'Shashi';
//pass Last Name
var lastName = 'Prasad';
try {
var tsDef = {
TriggeredSendDefinition: {
CustomerKey: tsExKey
},
Subscribers: [
{
EmailAddress: EmailAddress,
SubscriberKey: SubscriberKey,
Attributes: [
{
Name: 'firstName',
Value: firstName
}
]
}
]
};
var response = prox.createItem('TriggeredSend', tsDef);
var Status=response.Status;
var result=Stringify(response.Results);
var jsonResult=Platform.Function.ParseJSON(result);
var ErrorCode=jsonResult[
0
].ErrorCode;
var StatusMessage=jsonResult[
0
].StatusMessage;
Variable.SetValue("@status",Status);
Variable.SetValue("@ErrorCode",ErrorCode);
Variable.SetValue("@StatusMessage",StatusMessage);
}
catch(e){
Variable.SetValue("@status",
"error");
Variable.SetValue("@ErrorCode",
"0000");
Variable.SetValue("@StatusMessage",e.message);
}
</script>
{
"status": "%%=v(@status)=%%",
"ErrorCode": "%%=v(@-ErrorCode)=%%",
"StatusMessage": "%%=v(@-StatusMessage)=%%"
}
Step 4. We update our form control to add Reset button
We updated our html content block that we created in part 2 of this series, adding only the update part here, please refer part 2 for the difference.
<form class="row g-3" method="Post" id="consentForm" name="consentForm">
<div class="col-12">
<button type="submit" class="btn btn-primary">Submit</button>
<input type="reset" value="Reset"
class="btn btn-primary" id="reset" name="reset">
</div>
</form>
Step 5. Add JavaScript in our landing page for AJAX call
We implemented XMLHttpRequest by adding Event Listener, you can call AJAX function on different events and functions.
document.getElementById('consentForm').addEventListener('submit',consentSubmit);
We are listening to the form submit click and whenever it's invoked we would first prevent the page to load, so we add
e.preventDefault();
For XMLHttpRequest , we have 4 major functions we would consider :
1. Open
2. Load
3. Error
4. Send
Open : Update the underlined URL with your JSON Code resource URL
xhr.open('POST', 'https://tenantendpoint/FormTriggerSend', true);
Load : The main function our use case
xhr.onload = () => {
if (xhr.readyState === xhr.DONE) {
if (xhr.status === 200) {
console.log(xhr.response);
console.log(xhr.responseText);
document.getElementById('Outmessage').innerHTML=
'Submitted successfully! You will receive email shortly';
document.getElementById('reset').click();
}
}
};
Error : You can devise your own mechanism to handle the error.
xhr.onerror = function(){
console.log("** An error occurred during the submission");
}
Send : Post the data to the server/service request
xhr.send(formData);
Final Code :
<script>
document.getElementById('consentForm').addEventListener('submit',consentSubmit);
function consentSubmit(e){
try{
e.preventDefault();
var formData=new FormData(document.getElementById('consentForm'));
var xhr = new XMLHttpRequest();
xhr.open('POST', 'https://tenantendpoint/FormTriggerSend', true);
xhr.onload = () => {
if (xhr.readyState === xhr.DONE) {
if (xhr.status === 200) {
console.log(xhr.response);
console.log(xhr.responseText);
document.getElementById('Outmessage').innerHTML=
'Submitted successfully! You will receive email shortly';
document.getElementById('reset').click();
}
}
};
xhr.onerror = function(){
console.log("** An error occurred during the submission");
}
xhr.send(formData);
}
catch(ex)
{
alert(ex.message);
}
}
</script>
How does our landing page code looks like finally :
<!DOCTYPE html>
<html>
<head>
<meta name="viewport" content="width=device-width, initial-scale=1,
maximum-scale=1, user-scalable=0" />
<meta http-equiv="Content-Type" content="text/html; charset=UTF-8" />
<link rel="stylesheet"
href="https://tenantendpoint/ConsentStyles">
<link rel="stylesheet"
href="https://cdn.jsdelivr.net/npm/bootstrap@5.2.0/dist/css/bootstrap.min.css">
<link rel="stylesheet"
href=
"https://cdnjs.cloudflare.com/ajax/libs/twitter-bootstrap/4.5.2/css/bootstrap.css">
<script runat="server">
Platform.Load("Core","1.1.1");
try{
</script>
%%=ContentBlockbyKEY("ConsentBlock")=%%
<script runat="server">
}
catch(e){
Variable.SetValue("@message1",e.message);
}
</script>
</head>
<body>
<div class="p-3 mb-2 bg-secondary text-white">
<div class="section">
<div class="columns col1">
<div data-type="slot" data-key="col1">
<div class="alert alert-warning alert-dismissible fade show"
role="alert" id="message" name="message" %%=v(@hidden)=%%>
<strong>%%=v(@message1)=%%</strong>%%=v(@message2)=%%
<button type="button" class="close"
data-dismiss="alert" aria-label="Close">
<span aria-hidden="true">×</span>
</button>
</div>
<div class="alert alert-success !important" id="Outmessage"
name='Outmessage'
role="alert" style="text-align: center;color:red;" >
</div>
%%=ContentBlockbyKEY("ConsentForm")=%%
</div>
</div>
</div>
</div>
</body>
</html>
<script>
document.getElementById('consentForm').addEventListener('submit',consentSubmit);
function consentSubmit(e){
try{
e.preventDefault();
var formData=new FormData(document.getElementById('consentForm'));
var xhr = new XMLHttpRequest();
xhr.open('POST', 'https://tenantEndpoint/FormTriggerSend', true);
xhr.onload = () => {
if (xhr.readyState === xhr.DONE) {
if (xhr.status === 200) {
console.log(xhr.response);
console.log(xhr.responseText);
document.getElementById('Outmessage').innerHTML=
'Submitted successfully! You will receive email shortly';
document.getElementById('reset').click();
}
}
};
xhr.onerror = function(){
console.log("** An error occurred during the submission");
}
xhr.send(formData);
}
catch(ex)
{
alert(ex.message);
}
}
</script>
Step Finale. Run and Test your code
Recap:
1. We learnt how to create landing pages
2. We learnt how to use content blocks in landing pages
3. We learnt how to use code resource in landing pages


Comments
Post a Comment